
You build a Flutter widget, everything looks good, and you want to make sure it stays that way as the project changes. You probably already have tests that check whether buttons work, text appears, and the correct data is displayed.
But what happens when everything still works, while the UI no longer looks right?
That's where golden tests come in.
What is a golden test?
A golden test checks the visual appearance of your UI against a version you've already approved. The idea is simple:
- Create a reference image — render your widget, confirm it looks correct, and save an image of it. This is your golden image.
- Run the test — the test renders the same widget again and produces a new image.
- Compare — if the two images match, the test passes. If they differ, it fails.
You can think of the golden image as saying "this is what my widget is supposed to look like." Every test run then asks "does it still look like this?"
That's the whole concept. Everything else in this article is about making that question reliable.
Why not just widget tests?
Normal tests are good at checking behavior. We could test that tapping a View Profile button opens the correct screen, and that tells us the button works. It doesn't tell us the button looks correct.
The text could be misaligned, padding could disappear, an icon could shift, a color could change, or the button could become twice the size it should be. The application still works and the behavioral tests still pass. Golden tests add a layer that checks the visual result.
Where Alchemist fits in
Flutter already ships the foundation for golden testing via matchesGoldenFile. Alchemist is a package from Betterment and Very Good Ventures that sits on top of it, providing APIs for defining golden tests, grouping scenarios, and configuring the rendering environment.
One distinction matters throughout this article:
Alchemist prepares and renders the golden test. Flutter performs the actual image comparison.
Keep that in mind — it explains where the diagnostic output comes from when a test fails.
What Alchemist actually saves you
With plain Flutter, one visual state is one test:
testWidgets('profile card renders correctly', (tester) async {
  await tester.pumpWidget(const MaterialApp(home: ProfileCard()));
  await expectLater(
    find.byType(ProfileCard),
    matchesGoldenFile('goldens/profile_card.png'),
  );
});
Four states means four tests and four separate PNGs to open side by side when something breaks. Alchemist renders a group of scenarios into a single labelled image, so one file shows you every state at once — and it handles the environment setup that keeps those images stable across machines.
Platform goldens and CI goldens
This is the part that confuses most newcomers, so it's worth knowing before you generate anything: Alchemist maintains two separate sets of golden files.
- Platform goldens render text normally and land in
goldens/<platform>/, e.g.goldens/macos/. They're meant to run on developer machines and are skipped in CI by default. - CI goldens land in
goldens/ci/and, by default, replace text with colored rectangles.
The reason is that platform golden output depends on the machine that produced it. Text rasterization differs between operating systems, so a baseline generated on macOS will not reliably match one rendered on a Linux CI runner. We'll come back to this in detail — for now, just expect two directories.
Our example
We have a small ProfileCard widget containing an avatar, the user's name, and a View Profile button. The initial version has an icon inside the button.

This is the UI we've reviewed and decided is correct, and we want to protect it against unexpected visual changes.
Setting up
Add Alchemist to your dev dependencies and fetch:
dev_dependencies:
  alchemist: <version>
flutter pub get
Configure the environment
Alchemist reads its settings from an AlchemistConfig. The idiomatic place to establish one for the whole suite is test/flutter_test_config.dart — Flutter picks this file up automatically and wraps every test in the directory with it:
// test/flutter_test_config.dart
import 'dart:async';

import 'package:alchemist/alchemist.dart';
import 'package:flutter/material.dart';

Future<void> testExecutable(FutureOr<void> Function() testMain) async {
  return AlchemistConfig.runWithConfig(
    config: AlchemistConfig(
      theme: ThemeData.light(),
      platformGoldensConfig: const PlatformGoldensConfig(
        enabled: true,
      ),
      ciGoldensConfig: const CiGoldensConfig(
        obscureText: true,
        renderShadows: false,
      ),
    ),
    run: testMain,
  );
}
Without this file, every CiGoldensConfig snippet you find online has nowhere to live. This is the piece most tutorials skip.
Write the test
// test/profile_card_golden_test.dart
import 'package:alchemist/alchemist.dart';
import 'package:flutter/material.dart';

import 'package:my_app/widgets/profile_card.dart';

void main() {
  goldenTest(
    'Profile Card',
    fileName: 'profile_card',
    builder: () => GoldenTestGroup(
      children: const [
        GoldenTestScenario(
          name: 'Default',
          child: ProfileCard(),
        ),
      ],
    ),
  );
}
GoldenTestGroup groups one or more scenarios together, and GoldenTestScenario represents a particular UI state we want to capture. A real component might eventually look like this:
Profile Card
├── Default
├── Loading
├── Error
└── Long username
For now we'll stick with one scenario.
Generating the baseline
The first run needs to produce the image that becomes our approved baseline:
flutter test --update-goldens test/profile_card_golden_test.dart
Alchemist writes one file per goldenTest, named after the fileName argument, containing every scenario in the group as a labelled cell. So we get:
test/goldens/macos/profile_card.png
test/goldens/ci/profile_card.png
Open them and check they look right — this is the one moment where a human has to actually approve something. From here on, these files are the contract.
Alchemist also tags its tests, which is worth knowing early:
# Only golden tests
flutter test --tags golden

# Everything except golden tests
flutter test --exclude-tags golden
That's how you keep a slow visual suite out of your fast feedback loop.
Running the test
flutter test test/profile_card_golden_test.dart
Alchemist prepares the scenario and renders the widget, then Flutter compares the result against the approved golden. Nothing has changed, so the images match and the test passes.
Now let's change something.
Making a small UI change
We remove the icon from the View Profile button. That's it — no redesign, no broken layout. The button still works and the card still looks perfectly reasonable.

Run exactly the same test again and we get:
Pixel test failed, 0.54% diff, 1791px diff detected.
The golden image still contains the icon; the widget Flutter just rendered doesn't. The UI changed, so the pixels changed.
What actually happens when a test runs
Alchemist handles setup and rendering. The comparison itself is performed by Flutter's golden-file comparator. Conceptually:
Approved golden                 Current rendering
      ↓                                ↓
profile_card.png               Newly rendered image
      \                                /
       \                              /
        ───── Flutter compares ──────
                    ↓
              Pixels match?
               /        \
             Yes         No
              ↓           ↓
             Pass        Fail
If the pixels match, the test passes. If they don't, Flutter reports the difference — and gives us something considerably more useful than a number.
The failure images
When the comparison fails, Flutter writes diagnostic images to test/failures/:
profile_card_masterImage.png
profile_card_testImage.png
profile_card_maskedDiff.png
profile_card_isolatedDiff.png
Four views of the same failure.
masterImage
The approved baseline — in our case the original profile card with the icon. This is what Flutter expected to see.
testImage
What Flutter actually rendered during the failed test: the updated card without the icon.
Those two alone already tell you roughly what changed. The next two make it precise.
maskedDiff
Shows the current rendering with the differing pixels highlighted.

Instead of eyeballing two screenshots, you see immediately where the UI moved. Here the changed pixels cluster around the button, because that's where the icon was.
isolatedDiff
Goes one step further and shows only the differing pixels, stripped of everything else.

At first glance it looks almost empty, and that's the point — the small area that survived is exactly the region that changed.
Together:
- masterImage — what we expected
- testImage — what Flutter rendered
- maskedDiff — where they differ
- isolatedDiff — the differing pixels in isolation
These come from Flutter's comparator, not from Alchemist, which is why you get them regardless of how the test was set up.
1,791 pixels for one small icon?
That number sounds high for a change this small, until you remember what's being compared: pixels, not widgets.
Removing the icon changes the pixels the icon occupied, but it also changes the layout around it — the button text shifts left because it no longer shares space with an icon. Moving anything affects both the pixels where it used to be and the pixels where it is now. Anti-aliasing around text and shape edges adds more small differences on top of that. A tiny UI change routinely produces hundreds or thousands of differing pixels.
The percentage isn't the interesting part. The interesting question is why those pixels are different.
A failed golden test doesn't mean something is broken
A failure tells us "the UI looks different from the version you previously approved." It does not tell us "the new UI is wrong."
Flutter has no idea why we removed the icon; it only knows the images don't match. Interpreting that is our job. If the change was accidental, we fix the UI. If it was intentional — as it is here — we review the new appearance and update the baseline.
Updating the golden
flutter test --update-goldens test/profile_card_golden_test.dart
The newly rendered version becomes the approved baseline, and running the test normally now passes. That completes the basic cycle:
Create UI
    ↓
Generate golden
    ↓
Change UI
    ↓
Golden fails
    ↓
Inspect difference
    ↓
Intentional?
  /          \
No            Yes
↓              ↓
Fix UI     Update golden
Understand that loop and you understand the core of golden testing. The rest is about scale and stability.
Testing multiple scenarios
Our first test had a single scenario, but a profile card has several states worth protecting:
GoldenTestGroup(
  children: [
    const GoldenTestScenario(
      name: 'Default',
      child: ProfileCard(),
    ),
    const GoldenTestScenario(
      name: 'Long name',
      child: ProfileCard(name: 'Alexandros Papadopoulos'),
    ),
    const GoldenTestScenario(
      name: 'No avatar',
      child: ProfileCard(avatar: null),
    ),
    const GoldenTestScenario(
      name: 'Disabled button',
      child: ProfileCard(enabled: false),
    ),
  ],
)
We're no longer asking "does the profile card look correct?" but "does it look correct in every state we care about?" Alchemist renders them together into one image:
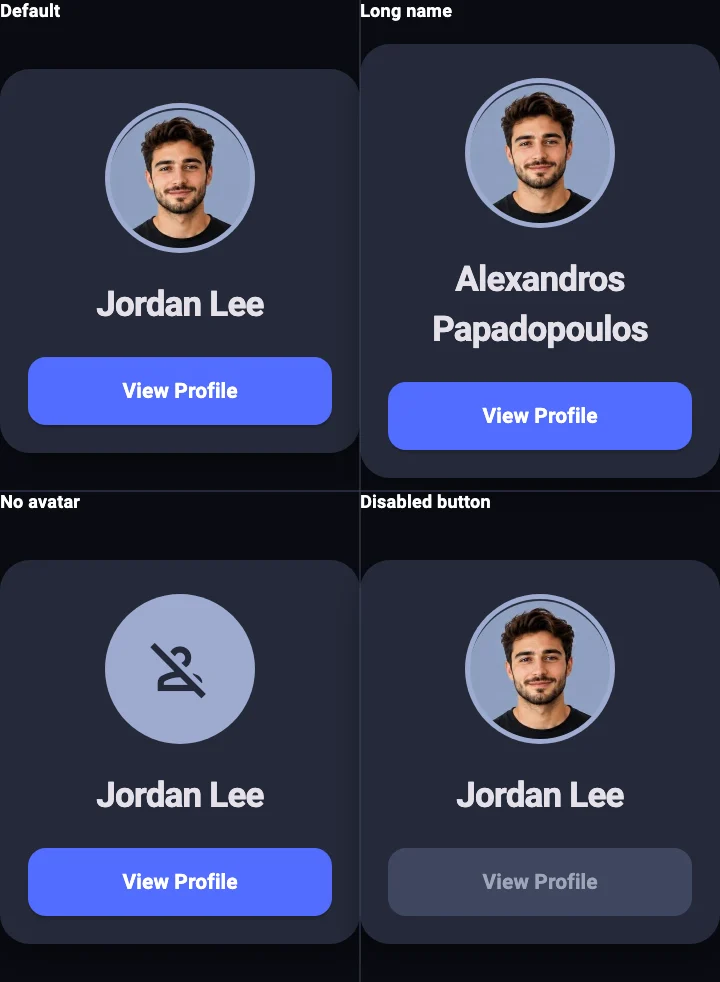
This is where golden testing earns its keep for reusable components: one change to ProfileCard gets checked against every important state at once. The same idea applies to loading and loaded states, errors, empty content, disabled controls, long text, optional content, and alternate themes.
The goal isn't to capture every possible combination — it's to protect the states that matter.
Testing different screen sizes
UI can look correct at one size and break at another. A layout that's fine on a phone might overflow on a tablet or look sparse in a wide desktop window. Scenario constraints let you capture that:
GoldenTestScenario(
  name: 'Tablet',
  constraints: const BoxConstraints.tightFor(width: 768),
  child: const ProfileCard(),
)
Mobile:

Tablet:

Desktop:

Same idea as before — render, approve, compare — except now we're protecting responsive behavior too. You don't need a golden for every resolution; a few meaningful breakpoints beat dozens of near-identical images.
Deterministic rendering matters
Golden tests compare pixels, which means anything capable of changing pixels can change the result. The usual suspects:
- fonts
- operating systems
- screen sizes
- animations
- shadows
- dynamic dates or times
- random data
- network images
- asynchronously loaded content
If a widget renders today's date, the golden generated today won't match tomorrow. That's not a visual regression, it's unstable test data. Animations are the same problem in miniature: capture the frame at a slightly different point and the pixels move even though the code didn't.
Good golden tests are deterministic — the same code and configuration produce the same image every time. In practice that means controlling the data, dimensions, fonts, animation state, and rendering environment.
Fonts deserve special attention
Text rendering isn't identical everywhere. Two operating systems can rasterize the same string with tiny pixel-level differences that are invisible to a person and glaring to a pixel comparator.
Depending on your Flutter version and test setup, you may need to load bundled fonts explicitly with a FontLoader in your flutter_test_config.dart. If your goldens come out full of fallback glyphs, that's the first thing to check.
This all becomes considerably more important the moment tests move into CI.
Running goldens in CI
We don't want golden tests running only when someone remembers. A simplified pipeline:
Pull request
     ↓
CI runs Flutter tests
     ↓
Alchemist renders goldens
     ↓
Flutter compares them
     ↓
   Match?
   /    \
 Yes     No
  ↓       ↓
Pass    Fail
          ↓
     Review change
Which raises the question the two golden sets exist to answer: which machine generated the baseline? A developer might be on macOS, CI on Linux, a colleague on Windows — and those environments don't render every pixel identically.
Why the CI golden shows rectangles instead of text
Run the CI configuration for the first time and the output looks alarming:
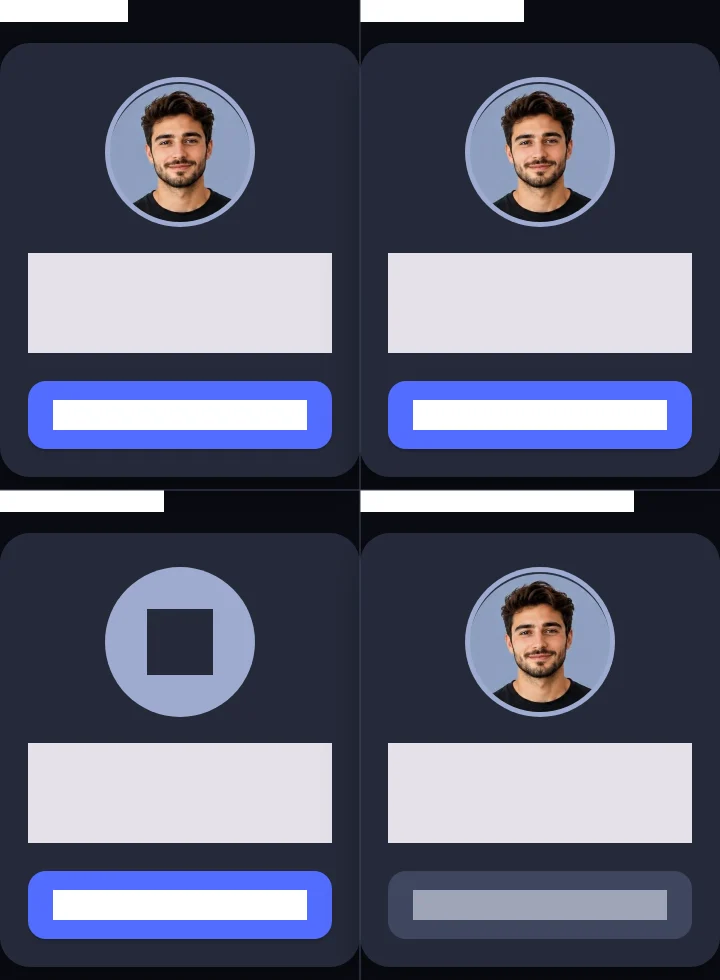
The fonts aren't broken. Alchemist is doing this deliberately, because of this setting from our config:
CiGoldensConfig(
  obscureText: true,
  renderShadows: false,
)
With obscureText enabled, readable text is replaced by rectangular blocks. The golden can still verify where the text sits, how much space it occupies, the surrounding layout, colors, padding, and component dimensions — without depending on the exact rasterization of every character. The rectangles are a portability strategy, not a bug.
Shadows have the same problem
renderShadows: false addresses the other common source of cross-platform variance. With shadow rendering disabled, Flutter draws a simplified, deterministic stand-in rather than a platform-sensitive blur.
Alchemist's default CI approach is therefore a deliberate trade: give up some visual fidelity in exchange for consistent cross-platform results. For most component tests that's a good deal.
When you want readable CI goldens
Sometimes rectangles aren't enough. If you're building a design system where typography is part of the visual contract — exact font, weights, line wrapping, character spacing, how type interacts with layout — you may want real text in CI:
ciGoldensConfig: const CiGoldensConfig(
  obscureText: false,
  renderShadows: true,
),
The cost is that you now own the rendering environment. Bundle the font with the app rather than fetching it at runtime:
flutter:
  fonts:
    - family: RobotoGolden
      fonts:
        - asset: assets/fonts/Roboto-Regular.ttf
          weight: 400
        - asset: assets/fonts/Roboto-Medium.ttf
          weight: 500
        - asset: assets/fonts/Roboto-Bold.ttf
          weight: 700
And select it explicitly in the theme:
ThemeData(fontFamily: 'RobotoGolden')
With obscuring off and a known font available, the CI golden becomes readable:
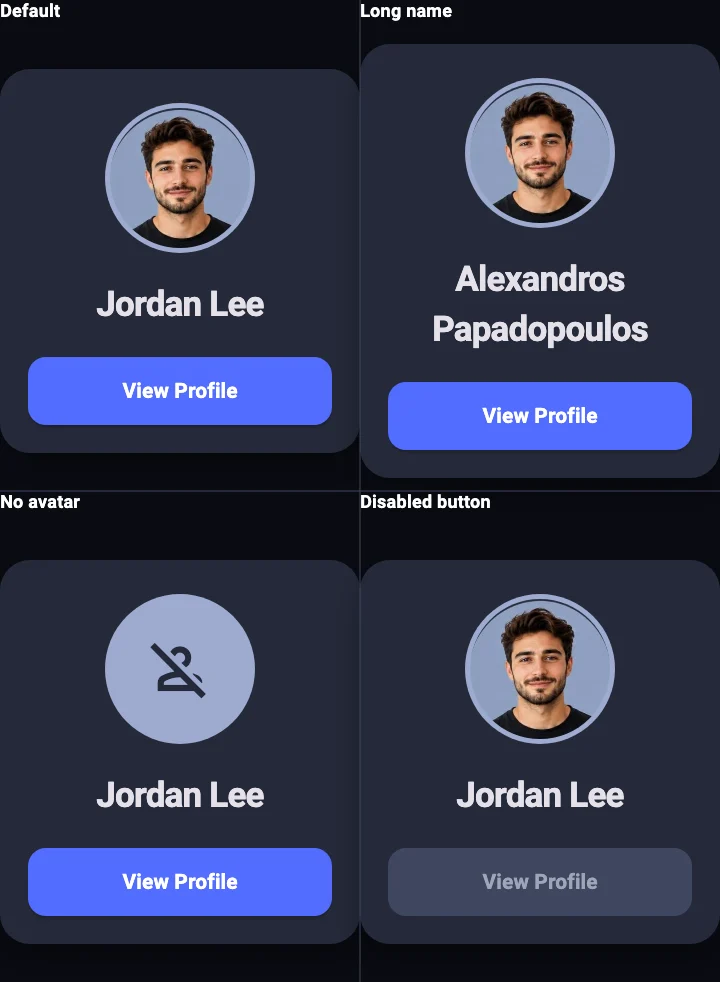
In our local CI-like run, the resulting image was byte-for-byte identical to the readable m